Sidebar
Setup cron task on your server
This article provides a step-by-step tutorial on how you can setup your cron task on your own server.
Only use this setup if you have the expertise of setting cron task on the server or you can hire an experienced person to setup for you.
You need to contact your hosting provider for the correct script to trigger the jNews Cron URL.
Some hosting providers can not launch the url of the jNews cron task. In that case, we recommend you to use our free service on our website or the cron plugin.
Once you have the correct script, you need to call below URL;
curl "http://www.yoursite.com/index2.php?option=com_jnews&act=cron"
The cron task will trigger your site every X minutes to automatically send your scheduled newsletters, Auto-Responders or SmartNewsletters. Please read the article on how to Setup your send process if you haven't set it up yet.
Below are samples from popular hosting control panels.
CPanel
Setting up cron task on your cpanel
1. Login to your Cpanel account
2. Browse for Advance Tab located at the buttom
3. Click on Cron Jobs
4. Kindly enter your email address in Cron Email Tab, if you want to receive an email everytime the cron job runs.
5. And click Update Email.
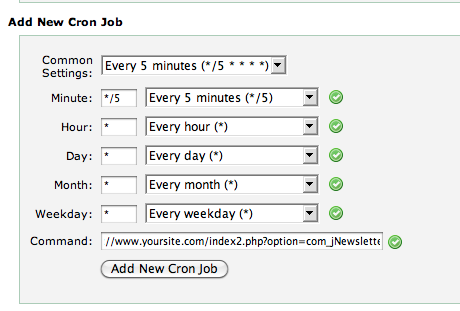
6. Next, set your desired frequency of your cron in the "Add New Cron Job"
7. Add this cron command curl "http://www.yoursite.com/index2.php?option=com_jnews&act=cron" in command field.
8. Then, click Add New Cron Job
Linux and Unix crontab command
Click this article that explains linux crontab command.
For SiteGround, the command should be:
lynx -source http://yourdomainname.com/index2.php?option=com_jnews&act=cron
Setting up the command line in Unix
There are different command line programs you can use to call the page from the command line. Not all of them may be available on a given server.
For example, you can use a Unix utility like 'wget':
wget -q -nd --delete-after 'http://www.yourwebsite.com/index2.php?option=com_jnews&act=cron'
The options:
-q = quiet (no message)
-nd = no directory
--delete-after = delete the downloaded file
Same with log file
wget -q -nd --delete-after 'http://www.yourwebsite.com/index2.php?option=com_jnews&act=cron' -O /home/public_html/cache/dull
When using SSL, add one additional argument when calling wget: --no-check-certificate.
Do not put “--no-check-certificate” between the -0 and the -.
*/15 * * * * /usr/bin/wget --no-check-certificate --quiet -O - 'https://www.yourwebsite.com/index2.php?option=com_jnews&act=cron'
Note in this example that the output is thrown away (to /home/public_html/cache/dull ).
A number of users of jNews have found that 'wget' sometimes fails. Especially if you have trouble with email digests not being sent on a daily basis to all users, an alternative command that solves the problem is:
php 'http://www.yourwebsite.com/index2.php?option=com_jnews&act=cron'
Set up your cron task using DirectAdmin
1. Log into DirectAdmin as user
2. At Advanced Features select Cronjobs
If you want a schedule every 10 minutes define as below:
Minute: */10
Hour: *
Day of Month: *
Month: *
Day of Week: *
Command: /usr/bin/curl -s -o /dev/null "http://www.yoursite.com/index2.php?option=com_jnews&act=cron"
Important are the quotes around the URL. Otherwise all looks perfect but mail will never be send.
Set up your cron task on Windows
Creating a Scheduled Task
- Open Scheduler
- Go to Start >> Programs >> Accessories >> System Tools >> Scheduled Tasks
- Double-click Add Scheduled Task
- The Scheduled Task Wizard will appear. Click Next.
- Select the program to run. Choose your browser from the list (for example, Internet Explorer or Mozilla Firefox). Click Next.
- Give the task a Name, such as jNews Cron Job, and choose the Frequency with which to perform the task (for example, Daily)). Click Next.
- Choose specific date and time options (this step will vary, depending on the option selected in the previous step). When finished, click Next.
- Enter your password if prompted. Change the username if required (for example, you'd like the task to run under a user with fewer privileges security reasons). Click Next.
- On the final page, select the check box Open advanced properties for this task when I click Finish and click Finish.
Configuring the task
- Go to the task's setting page either by checking the check box at the end of the last step, or by double-clicking on the task.
- In the Run box, after the text that is there now (for example, C:\Program Files\Internet Explorer\iexplore.exe), enter a space and then type the address to your website's cron.php page in double
- To set a frequency more often than Daily (for example, hourly), click the Schedule tab, then click Advanced. Here you can set options such as Repeat task, every 1 hour for 23 hours. Click Ok when finished.
- Change the start time on the task to one minute from the current time. This will allow you to test the task and make sure that it is working.
- When all settings have been configured to your liking, click Apply and OK (note: you may be prompted for your password)